10 November 2016
How to Wireframe a Mobile App in 3 Easy Steps

Not everybody knows where to start when it comes to creating an app wireframe. As we have already discussed in our previous post, that the key to success is a well-prepared Mobile App UX Design strategy. Wireframing is a part of this strategy, so from this post, you will know how to wireframe an app in three easy steps.
Step 1. Sketching
The first step of the mobile app wireframe should be sketching. It is a rough representation of all the ideas. Sketches can be done on paper with the help of a pencil, and it is actually the preferred way because of the overwhelming amount of options in digital tools that might get in your way. You might end up deciding what is the best line/font/shape to use instead of thinking about the core ideas. You are free to choose some digital tools, but it is easier to create a sketch on paper.
By simply outlining the main elements and ideas, you will be able to quickly show your suggestions on the structure of the future app to all stakeholders. The details should be omitted: you will have time to focus on them later. The only things you should care about now are your ideas.
Here is an example of rough sketches that we made for a Trip Tracker app, the main idea of which was to allow users to save memories from their trips.
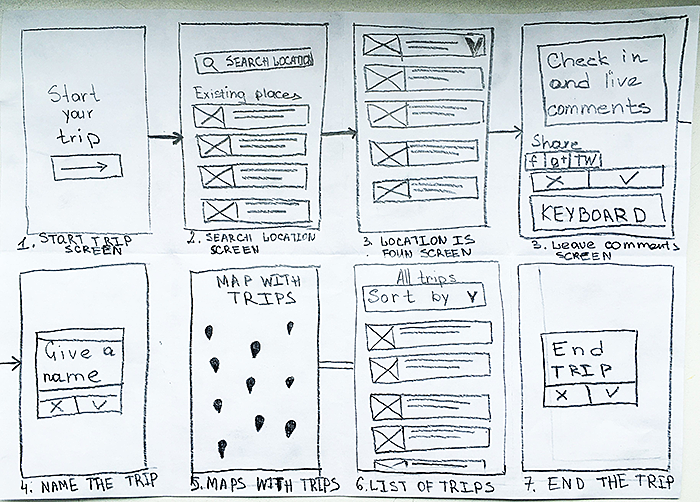
So find a pen and a piece of paper and put down your thoughts. No special skills required, you can do that if you can draw boxes, circles and lines. After that try to get some feedback, improve the sketches and generate some new ideas. When all features and main elements are presented on paper, and you continue developing them on a more profound level, the rough sketches turn into detailed sketches, and they now can be called wireframes. But still it is just a matter of choice as to what to call them, but if you prefer, you can continue calling them sketches.
Step 2. Wireframing
While wireframing, you're simply developing the ideas that you came up with during the sketching part. Wireframes are created with a more detailed structure and usually with the help of digital tools. But still their main goal is to prepare ideas for the future validation as it is still not the time for the final decision. There will be several updates made to the wireframes before you will be able to decide what ideas deserve to be promoted and what ideas should be dropped. And you will make a decision upon well-developed ideas, that you will see as a result.
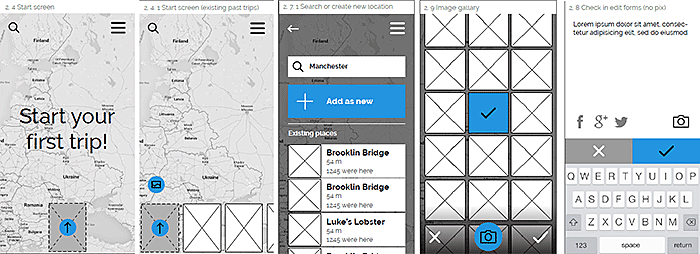
Agente made a lof a wireframes for iOS apps, for example, and below you can see an example of wireframes for the Trip tracker app.
So to start wireframing, you need to choose the right tool for you. If you have nothing specific on your mind, start with this article where you will find the review of most popular prototyping tools that might be extremely useful not only for iOS app wireframes but also for Android app wireframes. Here are a few examples of such tools:
- Balsamic
- Illustrator
- Axure
- Sketch
But you can search the Internet for other options that would suit you best. If you build a wireframe for an Android app, for example, make sure you know the specifics. The same is applied to the iOS app as these two systems have their own peculiarities.
After you explore the ideas, it is important to get the feedback to incorporate some comments into your wireframes. It may take a few iterations before the final variant will be presented, but as a result, some ideas will be implemented, a set of requirements will be created and you will be aware of the possible constraints.
Step 3. Prototyping
A prototype is still an idea and not the finished product, and it looks like the wireframes. The only difference is that it is certainly a well-developed wireframe. The mockup appears after several iterations of wireframes, as some ideas are considered good enough to be pursued while others fall away. You may add some interactivity with the help of such applications as InVision, for example, or you can even do some light coding to communicate ideas in a better form. After the prototype is finished, you will be able to do some user testing to prove your concepts and then made some improvements and adjustments in your prototype.
Instead of a conclusion
The transition between sketching, wireframing, and prototyping is very smooth, and there are no set boundaries. That is probably why these three concepts can be used interchangeably sometimes. But sketches and prototypes can be seen as the beginning and end result of the wireframing. However, it is still a matter of choice. And despite the difference, they are all designed to help you communicate your ideas.
Everyone can start sketching without any special skills or knowledge, but if you are looking for a more profound approach, the best option will be to hire a team of professional UX designers. Agente supports mobile app projects from the sketching phase up to the fully developed apps. Our experience and comprehensive knowledge allow for a better understanding of the whole process.


Rate this post!
340 ratings, average ratings is 4.9 out of 5

Related Posts

22 January 2024
Top 15 Software Project Risks and Mitigation Examples in 2024
Explore our guide to the top 15 software project risks and learn mitigation examples to ensure project success.

Travel Agency Website Development in 2024: Features, Tech Stack & Cost
Explore the world of Travel Agency Website Development, discover features, and get insights into the costs of building your online travel platform.

29 April 2022
How to Design a User Profile Page in 2022
User profiles can become a constant flow of customer-related data that is extremely useful for marketing. How to design a user profile page? Read in our new article.

How to Write a Project Brief for Websites & Mobile Apps the Right Way
We are talking about the importance of a project brief in the success of an app and website development There are many reasons for that, but a common one is a discrepancy between what a client had in mind and what was written in the design or app design brief template.

13 November 2018
How to Use Animation in Mobile Apps
Mobile apps and motion design should go hand in hand. Animations can improve navigation and interactions. When is it appropriate to use animation in a mobile app? Read on this post to find it out.
How to Design a Pricing Page That Converts
A successful pricing page acts as a sales rep, enticing site visitors into making a purchase, launching a free trial or contacting a member of a sales team. In this article, Agente team gets down to the nitty-gritty of creating a high-converting one.
Let's talk
Is there a challenge your organization or company needs help solving? We’d love to discuss it.

Managing Director, Partner
Andrew Terehin

Thank You!
Your message has been successfully sent.
We will contact you very soon.