28 February 2019
10 Best Practices for Usability Testing
Everyone wants their products to be loved by the target audience and stand out from the competition. Eye-catching design works like a charm when it comes to piquing the interest of first-time users. But it will never help you reach the goals you associate with your products without proper usability.
What Makes Usability Important?
Usability has a tremendous impact on user experience (UX). Poor usability means a bad UX. And a bad UX means millions of dollars you can potentially lose. This is true for digital and physical products and systems including websites, mobile apps, ticket machines, POS system design, and so on.
In a nutshell, good usability is a marriage of multiple factors: intuitive design, ease of learning, efficiency of use, memorability, error frequency, error severity, and user satisfaction.
What Are the Benefits?
By implementing a usability testing process throughout your project, you will gain some distinct advantages. At the prototype stage, for instance, you will be able to identify and fix problems that could cause harm to a working product. If it’s an existing product, you will develop a clear vision of how to tweak it in order to meet your aims for it.
You will also eliminate additional support costs that could arise and achieve a lower abandonment rate at an e-commerce store.
When to Perform Usability Testing
In an ideal world, usability testing is employed not only when a product is designed and developed but also when it is launched. This way, a smooth UX and user satisfaction will be reached.
Some practitioners also test competitors’ products to find out their strengths and flaws and learn from their mistakes. But in reality, this practice is often overlooked and the testing is used only when it seems necessary.
What are the usability testing guidelines one should follow? And what are the best practices for usability testing? Read on to learn about them.
Usability Testing: Best Practices
We prepared a step-by-step guide to usability testing to help you develop a deep understanding of the whole process.
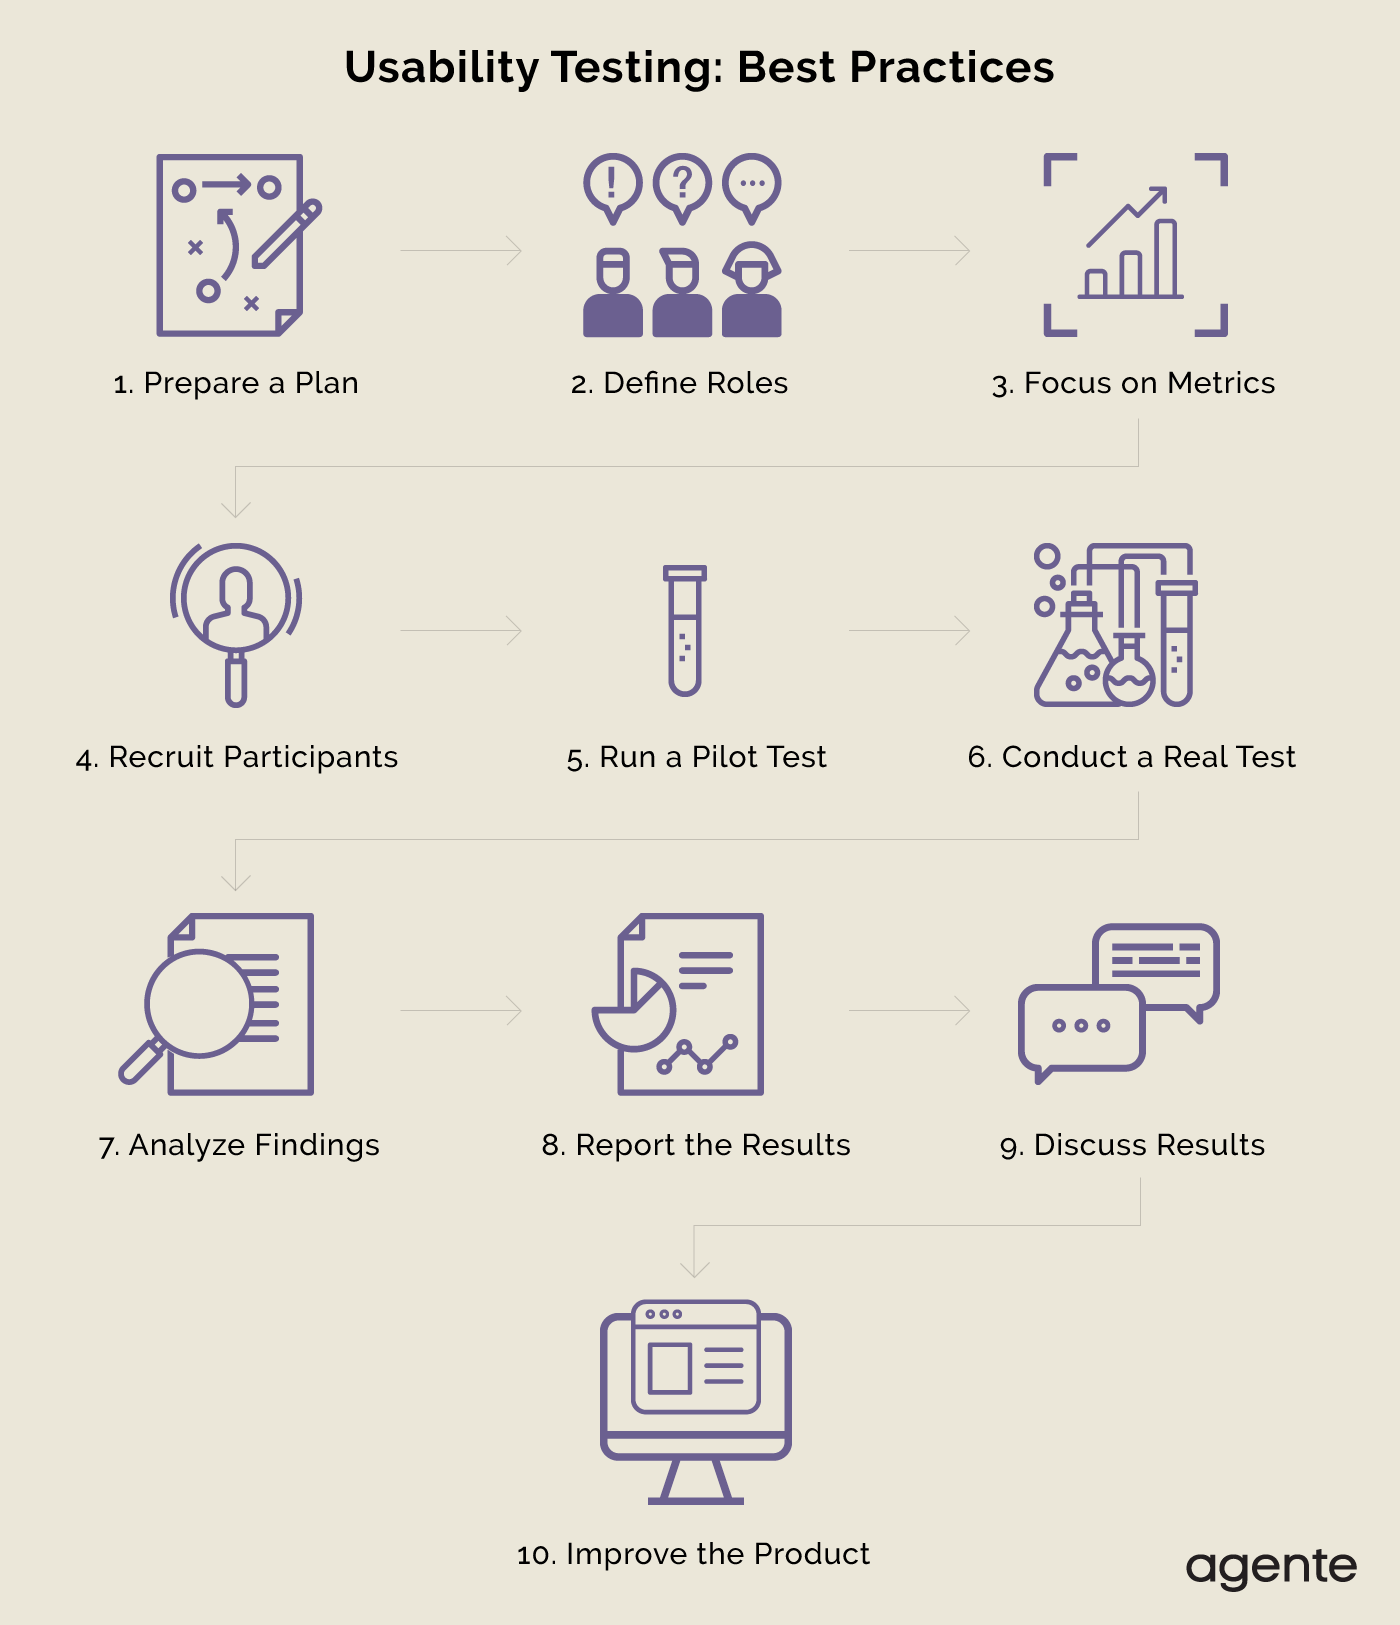
Step One: Prepare a Plan
The very first step towards a successful test is devising a plan. What makes a great plan in our case? There are some essential elements that will do the trick:
- Scope. Sit down, take a deep breath, think for a while, and write down the testing scope. Mention a product name, the development stage when the test will be performed (if applicable), and specify what needs to be covered. This may be site features like navigation, content, etc.
- Purpose. Answer the question of why you need the test. For instance, you wish to find out why users leave the checkout page of your online store without finalizing a purchase, or whether the site navigation is user-friendly enough, or if a search box is placed where people can find it, etc.
- Timing and location. Decide on the exact time and location of the test, the number of sessions you are going to hold and the amount of time you will spend on each session. Make sure that there’s some extra time between sessions in case of any delays, or if you need to immediately discuss session results with your team.
- Equipment. What equipment will you and the participants use? Give a detailed description of all equipment, including screen resolutions, OSes, monitor sizes, etc. Remember to capture sessions, for instance, with video equipment. This will give you a chance to revisit a certain session and review participants’ reaction and their body language if you think you may have missed something.
- Participants. Answer the following questions: Who will participate in sessions? What is their age, gender, etc.? How many are needed? How will they be recruited?
- Scenarios. Decide on the tasks that will be included in testing, their order, and the time that participants can spend on them.
Step Two: Define Roles
It’s hardly possible for one person to manage and monitor all the processes alone, so you will need assistance. Compile a list of your team member who will be involved and their roles, including observers, note-takers, facilitators, etc.
Step Three: Focus on Metrics
Identify the metrics you are going to collect during the sessions. There are two types:
- Quantitative metrics. They will depend on the purpose of testing. For instance, you may need to know how many people completed the task goal (e.g., clicking a CTA button), how much time they spent on a task, errors they made, etc.
- Subjective metrics. These are the participants’ answers to your questions about their satisfaction, ease of tasks, likes, dislikes, etc. Asking for recommendations to improve your product can also do you a good turn.
Step Four: Recruit Participants
Best practices for usability testing in UX design show that recruiting participants who belong to your product’s target group is not enough. You may have more than one potential user group. So do your best to ensure that representatives of all these groups will participate in your sessions. Asking your team to take part is usually a bad idea. This is suitable only when they are your target group.
There are several approaches to recruiting people for your tests: ask your HR department or an external HR team to find the candidates, ask your friends and family to get involved, or turn to existing users’ assistance.
Step Five: Run a Pilot Test
Prior to conducting a real test, do a pilot test. Don’t skip this, as it will help you see whether you are well-prepared or not, and whether you need to introduce amendments to your scenario, tasks, equipment, timing, and so on.
Use your internal staff and volunteers for this purpose. You deal with technical issues, not test results.
Step Six: Conduct a Real Test
Now you are ready for a real test. Follow your scenario, moderate sessions wisely, be attentive to participants but do not lead them, just observe, or you’ll get inaccurate results. Listen to what people say, and observe their body language to get additional data.
Step Seven: Analyze Findings
After sessions are finished, you will have to get down to the analysis. It is the most significant part of any research and the only way to get the information you need. Summarize the data gathered at the sessions and interpret it with the help of analytical and logical reasoning.
Step Eight: Report the Results
Organize the results in an easily digestible manner so that your team can clearly grasp all the details. Writing a test summary report is a good idea. Include the project information, test objective, and summary as well as the results. Use graphics to improve the readability.
Step Nine: Discuss Results
Having a report in place is not enough; you need to present the information to your colleagues. Make a presentation with key findings and encourage your team to discuss them with you. This step is very important; some essential details might have been missed, some great ideas about how to improve your product could come to light, etc.
Step Ten: Improve the Product
Nothing is perfect, and testing will certainly reveal some weaknesses in your product. If you know about these weaknesses, you can eliminate them to improve the product, thus increasing its usability, and ensuring it meets the goals you originally set for it.
Final Thoughts
Usability testing plays a big role in all stages of product development and can also be used when the product is launched. In this blog post, we described some best practices of usability testing to show you how it works.
It's important to note that usability testing is a key strategy in mitigating risks in software development, ensuring the final product aligns with user needs.
Need more usability testing examples or want to share your opinion with us? Don’t hesitate, drop a line to the AGENTE team right now.


Rate this post!
836 ratings, average ratings is 3.0 out of 5

Related Posts
22 January 2024
Top 15 Software Project Risks and Mitigation Examples in 2024
Explore our guide to the top 15 software project risks and learn mitigation examples to ensure project success.

07 January 2024
The UX Audit: A Beginner's Guide For 2024
A user experience audit (UX audit) is a great way to reveal the non-perfect areas causing severe headaches for users, and to get recommendations on how to improve them to make it easier for visitors to reach their goals on the website, thus boosting conversions, improving user engagement, and generating more leads, among other benefits from a UX audit. Let's dig deeper into details in our new article.

How to Write a Project Brief for Websites & Mobile Apps the Right Way
We are talking about the importance of a project brief in the success of an app and website development There are many reasons for that, but a common one is a discrepancy between what a client had in mind and what was written in the design or app design brief template.

06 June 2019
How to Choose a Technology Stack For a Web Development | AGENTE
Choose the right tech stack for your project and chances are high that end-users will rave about it. In this blog post, we will discuss how to select the best technology for a web application.

23 May 2019
User-Centered Design: Specifying Requirements For a Project
The goal of this article is to tell you how to create a bigger picture of your project by crafting a requirement specification from the user-centered perspective.

16 January 2024
ChatGPT Plugin Development: Features and Benefits for Business
Explore the process of crafting a ChatGPT plugin tailored precisely to meet your unique business requirements.
Let's talk
Is there a challenge your organization or company needs help solving? We’d love to discuss it.

Managing Director, Partner
Andrew Terehin

Thank You!
Your message has been successfully sent.
We will contact you very soon.